This is a 4 lesson unit plan that focuses on the Earthworks creations of Andy Goldsworthy. Following the Unit plan is a quick presentation about Goldsworthy, some examples of his art, and why he is important to learn about.
SUBJECT: Visual Art 8 GRADE: 8 DURATION: 3-4 classes
Resources and Citations:
Andy Goldsworthy Website: Biography, Philosophy and work
http://www.ucblueash.edu/artcomm/web/w2005_2006/maria_Goldsworthy/biography.html
http://www.morning-earth.org/ARTISTNATURALISTS/AN_Goldsworthy.html
Andy Goldsworthy: Digital Archive
http://www.goldsworthy.cc.gla.ac.uk/
Rivers and Tides: A documentary about Andy Goldsworthy
http://www.youtube.com/watch?v=kGFOLChNOak
Goldsworthy’s Philosophy in his own words
For me looking, touching, material, place and form are all inseparable from the resulting work. It is difficult to say where one stops and another begins. Place is found by walking, direction determined by weather and season. I take the opportunity each day offers: if it is snowing, I work in snow, at leaf-fall it will be leaves; a blown over tree becomes a source of twigs and branches.
Movement, change, light growth and decay are the lifeblood of nature, the energies that I try to tap through my work. I need the shock of touch, the resistance of place, materials and weather, the earth as my source. I want to get under the surface. When I work with a leaf, rock, stick, it is not just that material itself, it is an opening into the processes of life within and around it. When I leave it, these processes continue.
The energy and space around a material are as important as the energy and the space within. The weather—rain, sun, snow, hail, calm—is that external space made visible. When I touch a rock, I am touching and working the space around it. It is not independent of its surroundings and the way it sits tells how it came to be there. In an effort to understand why that rock is there and where it is going, I must work with it in the area in which I found it.
BIG IDEA – Working with the landscape and looking into the heart of nature through creation generates a new and ever growing understanding of place, time, culture, process, materials, and circumstance.
| Desired Results |
Established Goals (PLO’s)
- What relevant goals will this design address?
- Demonstrate a willingness to try unfamiliar materials and processes and adapt familiar ones for unfamiliar uses.
- Demonstrate an awareness of safety and environmental considerations related to materials, technologies, and processes.
- Create 2D and 3D images that combine and emphasize particular visual elements and principles of art and design.
- Analyze 2D and 3D images for their use of particular visual elements and principles.
- Create images that incorporate elements from various artists, movements, and periods.
|
| Understandings
Students will understand:
- What specific understandings about them are desired?
- What misunderstandings are predictable?
- Students will understand the dynamics of using new materials or familiar materials in a new way.
- Students will understand the potential power that comes from focusing on one or two elements or principles of art and design.
- Art is kinetic and sometimes fleeting.
|
Essential Questions
What provocative questions will foster inquiry, understanding and transfer of learning?
- What is Art?
- Why do artists make art?
- Is it still art if no one other than the artist sees it?
- How does art reflect the time, place, and culture in which it was made?
|
Students will know:
- What key knowledge skills will the students acquire as a result of this unit?
- Students will know about the philosophy and work of Andy Goldsworthy.
- Students will gain an understanding of using new materials and the challenges that brings.
- Students will know that art isn’t only made for museums.
- What should they eventually be able to do as a result of such knowledge and skills?
- They should be able to use new materials in novel ways.
- They should be able to see examples of unconventional art or the potential for art making around them in their everyday lives.
- They should be able to incorporate the elements and principles of art and design into their art and conversation.
|
Students will be able to:
- Students will be able to discuss the work of Andy Goldsworthy and his work using vocabulary related to the elements and principles of art and design.
- Plan and prepare an earthwork sculpture.
- Create an Earthwork based on their understanding of place, time, and circumstance.
- Demonstrate the importance of environmental considerations of creating Earthworks.
|
|
Assessment Evidence
|
Summative:
- Through what authentic performance tasks will students demonstrate the desired understandings?
- By what criteria will performances of understanding be judged?
- Exit slips regarding materials, process, and environmental sensitivity.
- Students will demonstrate their understanding of the elements of art and design as they apply to Earthworks by creating an original piece and photographing it.
- Students will be evaluated on their analysis of the use of elements and principles of art and design through a guided gallery walk.
- Students will demonstrate their understanding of Andy Goldsworthy’s philosophy and work through a questionnaire
|
Formative:
- Through what other evidence (e.g. quizzes, tests, academic prompts, observations, homework, journals) will students demonstrate achievement of the desired results?
- What provision will there be for formative assessment?
- How will students reflect upon and self-assess their learning?
- Class and small group brainstorming
- Working together to create criteria
- Elements of Art and Design Trivia Game
- Idea development through personal sketches
|
|
Learning Plan
|
Lesson
& Date |
IRP Outcomes
PLO |
Specific Lesson Outcomes
SLO |
Activities
Teaching Strategies |
Materials/ Resources |
Assessment |
| Lesson 1 |
Demonstrate a willingness to try unfamiliar materials and processes and adapt familiar ones for unfamiliar uses.
Demonstrate an awareness of safety and environmental considerations related to materials, technologies, and processes.
Create 2D and 3D images that combine and emphasize particular visual elements and principles of art and design.
Analyze 2D and 3D images for their use of particular visual elements and principles.
Create images that incorporate elements from various artists, movements, and periods.
|
Demonstrate a willingness to try unfamiliar materials and processes and adapt familiar ones for unfamiliar uses.
Demonstrate an awareness of safety and environmental considerations related to materials, technologies, and processes.
Create 2D and 3D images that combine and emphasize particular visual elements and principles of art and design.
Analyze 2D and 3D images for their use of particular visual elements and principles.
|
Hook – New Materials – 2 min
After Ss are seated, teacher takes out new materials from box. Teacher can ham it up by acting very excited each time a new material is revealed. Materials may include; rocks, leaves, dirt, sticks, flowers, berries, and a jar of water.
Shape of the day – 2 min
Go over together on the board.
Discussion of new Materials – 5 min
In seated groups, students discuss the materials presented to them and then a class discussion is developed. Guided questions;
1) What do you see?
2) Are these familiar items?
3) Can art be made of these items?
4) How could you make something that describes a place and time with these items?
Transition – 2 min
Andy Goldsworthy Introduction – 12 min
Transition – 2 min
Elements Trivia – 15 min
- Each group receives a trivia sheet. At the top of each sheet is a list of the elements of Earth (earth, wind, fire, water) and the elements (Line, Colour, Value, Shape, Form, space, Texture) and principles (Unity, Pattern, Movement, Contrast, Emphasis, Balance) of art and design
- Teacher reads out questions and students write down their answers making sure to discuss them quietly so other groups don’t hear them.
- Answer sheets are switched among groups for scoring.
Transition – 2 min
Andy Goldsworthy – The elements and principles of art and design. 8 min
- On the overhead, look at some of Goldsworthy’s Earthworks and discuss them in terms of the elements and principles of art and design.
Think/Pair/Share – 5 min
- Students reflect with a partner on the images they just saw
- Teacher guides the conversation by posting questions on the overhead.
1) Was there anything that you saw that surprised or inspired you?
2) How could you use the materials shown at the beginning of the class to demonstrate your understanding of the elements and principles of art and design?
3) Are there other natural materials you would like to try, if so what are they and what might you do with them?
4) What are the most important elements of Goldsworthy’s Earthworks?
- Students are asked to share with the class.
Making the criteria – Mind map – 6 min
Frontload that we will use this information to determine the criteria for our project.
- Teacher writes on the board “Earthworks”
- Students make suggestions about the most important elements or aspects of earthworks in Goldsworthy’s art.
- Students are invited to suggest other criteria based on these questions; What do I know? What do I want to know? How will I learn it?
- NOTE: Environmental sensitivity
Criteria discussion – 4 min
- Teacher reiterates the criteria and writes it on the board. A rubric will be provided for the students in the following class based on the criteria they devised.
Collect permission slips – 3 min
Students are asked to hand in the permission slips for the field trips to the site of the project.
Idea development – 10min
Students sketch or write in their sketchbooks about ideas they may have developed in order to begin creation of their own Earthworks. Placing emphasis on the elements of art.
Closure – 2 min
Remind remaining students to bring permission slips and cameras if they have them but that some will be available if they can’t get one.
|
Box containing bags of sticks, rocks, dirt, flowers, leaves, berries, jar of water
Projector and computer
Elements trivia student sheet x 10. Teacher sheet x 1
Goldsworthy website cued up
Board and marker
Extra permission slips and checklist
Student sketchbooks, extra pencils x 10
|
Formative:
Mind map – Creating criteria
Elements Trivia
Group and class discussion
Independent sketches
|
| Lesson 2 |
Demonstrate a willingness to try unfamiliar materials and processes and adapt familiar ones for unfamiliar uses.
Demonstrate an awareness of safety and environmental considerations related to materials, technologies, and processes.
Create 2D and 3D images that combine and emphasize particular visual elements and principles of art and design.
Analyze 2D and 3D images for their use of particular visual elements and principles.
Create images that incorporate elements from various artists, movements, and periods.
|
Demonstrate an awareness of safety and environmental considerations related to materials, technologies, and processes.
Create 2D and 3D images that combine and emphasize particular visual elements and principles of art and design.
Create images that incorporate elements from various artists, movements, and periods.
|
Hook – Rivers and Tides – 2 min
As the students take their seats, the documentary is playing on the overhead.
Criteria – 5 min
The teacher has posted the criteria for the project that was planned by the students in the previous class.
- Go over the criteria again as a class and place exaggerated importance on the environmental practices of the students while creating their sculptures.
- Handout rubric so students have it with them while they are creating their Earthwork.
- Ask guiding and checking questions to the students to ensure they understand this importance.
Collect permission slips and head to the site (Renfrew Ravine) – 7 min
- Before leaving make sure students are dressed for the weather as this is a rain or shine exercise.
- Ask students if they have a smart phone with camera and bring a digital camera for those who might not.
- On the way to the site, discussions can be had about the physical qualities of the elements and principles of art and design.
Front Load – 2 min
- Once at the site, have the students repeat back all the “rules” about environmentally sustainable practices. Choose students who haven’t already verbalized this importance in previous discussions.
Exploration – 5 – 7 min
- Allow students to explore the site choosing a place that affords the enough space to work freely.
Exporation – 27 – 30 min
- Students now have time to explore materials and ideas for developing their Earthworks.
- Teacher circulates through the space making sure to touch base with each student. Ask questions to each student; What are you doing to ensure that you are being environmentally sensitive? What elements and principles of art and design are you exploring? Have you come across any issues or problems that you needed to solve in order to make your sculpture? If so, how did you solve them? Of the work we saw by Andy Goldsworthy, which work inspired you the most and why.
- Record student answers on a check list. If students could not answer a specific question, return to them to give them time to think.
Return to the school – 7 min
- This is another opportunity to return to the students who needed more time to think about their answers.
Closing – Discussion and Exit slips – 6 min
- Have a class discussion about the materials they explored and any problems, surprises, or questions they ran into. Have table groups try to work out the problems.
- Answer the exit slip reflection questions before leaving for the day.
|
Computer and projector
Criteria poster and rubric x # of students
Permission slips checklist
Charged digital cameras x 2
Student conference checklist
Camera image transfer cord.
Exit slip reflection x # of students
Extension activity for students without permission slips.
First aid Kit
Whistle
|
Formative
Student /teacher conferences
Teacher observation
Earthwork exploration
Class discussion/group about problems and solutions
Exit slip
Summative
Teacher observation
Student teacher discussions
Earthwork Sculpture
Extension activity for students without permission slips
|
| Lesson 3 |
Demonstrate a willingness to try unfamiliar materials and processes and adapt familiar ones for unfamiliar uses.
Demonstrate an awareness of safety and environmental considerations related to materials, technologies, and processes.
Create 2D and 3D images that combine and emphasize particular visual elements and principles of art and design.
Analyze 2D and 3D images for their use of particular visual elements and principles.
Create images that incorporate elements from various artists, movements, and periods.
|
Demonstrate an awareness of safety and environmental considerations related to materials, technologies, and processes.
Create 2D and 3D images that combine and emphasize particular visual elements and principles of art and design.
Create images that incorporate elements from various artists, movements, and periods.
|
Intro – 4 min
Class discussion – Ask students if they have any questions that might have arisen after the last class. Reiterate the criteria and go over the rubric one more time.
Transition – 7 min
Return to the Renfrew ravine for a working period. Before leaving ask students if they have a camera. Bring a charged digital camera for those who don’t have one.
Working period – 40 min
- Students return to their space and start developing their Earthwork.
- Teacher circulates through the space making sure to touch base with each student. Ask questions to each student; What are you doing to ensure that you are being environmentally sensitive? What elements and principles of art and design are you exploring? Have you come across any issues or problems that you needed to solve in order to make your sculpture? If so, how did you solve them? Of the work we saw by Andy Goldsworthy, which work inspired you the most and why.
- Record student answers on a check list. If students could not answer a specific question, return to them to give them time to think.
Transition – 7 min
Everyone returns to the school.
Closure – photos and postcards – 7 min
- Students email their images or download them onto the teacher’s computer for printing the next day. If any students weren’t finished they will be allowed to return to their Earthwork and complete it to their satisfaction as long as they email their image to the teacher by 6:00pm the day prior to the next class.
- As students are uploading the images one by one they will also be asked to write a postcard to a friend or family member describing what they learned, enjoyed or struggled with while they wait for their turn on the computer.
|
Computer and projector
Criteria poster and rubric x # of students
Permission slips checklist
Charged digital cameras x 2
Student conference checklist
Camera image transfer cord.
Exit slip reflection x # of students
Extension activity for students without permission slips.
First aid Kit
Whistle
|
Formative
Student teacher discussions
Teacher observation
Summative
Student Earthworks
Student teacher discussions
Postcards |
| Lesson 4 |
Demonstrate a willingness to try unfamiliar materials and processes and adapt familiar ones for unfamiliar uses.
Demonstrate an awareness of safety and environmental considerations related to materials, technologies, and processes.
Create 2D and 3D images that combine and emphasize particular visual elements and principles of art and design.
Analyze 2D and 3D images for their use of particular visual elements and principles.
Create images that incorporate elements from various artists, movements, and periods.
|
Demonstrate a willingness to try unfamiliar materials and processes and adapt familiar ones for unfamiliar uses.
Analyze 2D and 3D images for their use of particular visual elements and principles.
|
Hook: Gallery Walk – 3 min
- Teacher walks around the room as if she were in an art gallery. Moving closer and then farther away from artwork on the wall.
- Ask students what this looks like and ask if they can guess what we are doing for the day.
Shape of the day – 1 min
- Go over together on the board.
Hand back Student images – 2 min
Class discussion – Art Criticism – 5 min
- Write on the board the following; Praise, Criticism, Constructive Criticism.
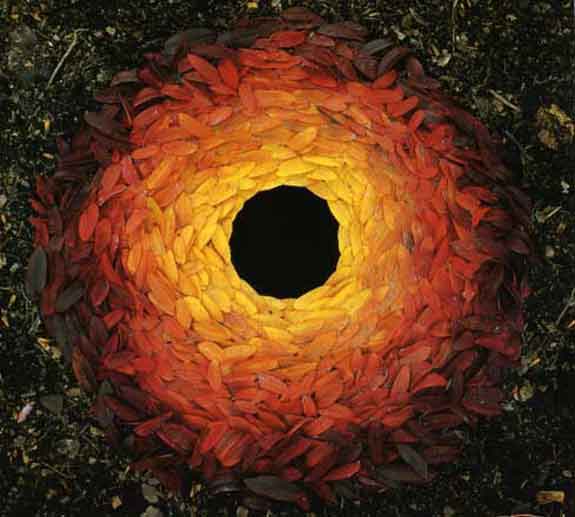
- On projector, put up image, Elm Leaves; Llikley, Yorkshire, September 1978.
- Use this image to discuss the difference between Criticism, Praise and Constructive criticism.
- Use the gallery walk questions to model appropriate answers.
1) What materials and processes do you think the artist used?
2) What part of the image immediately catches your eye? Why do you think that is?
3) Which of the elements and principles of art and design are expressed in the image?
4) How does the use of elements and principles of art and design connect the sculpture to the land?
- Ask searching questions to check for understanding.
Gallery Walk set up – 2 min
- To prepare for the next activity, they must clear off their desks (except image) and get a pen or pencil.
- While students are preparing, the teacher can hand out 4 different coloured sticky notes to each student.
Gallery walk – 15 min
- The students walk around with 4 different coloured sticky notes in their hand and a pen.
- When the teacher rings a bell, students stop at the image in front of them and write their answer on the sticky note about the image according to the question posted on the projector.
- Students should avoid language like “I like how you…..”
The students are to follow the question prompts for each of their notes.
- What materials and processes do you think the artist used?
- What part of the image immediately catches your eye? Why do you think that is?
- Which of the elements and principles of art and design are expressed in the image?
- How does the use of elements and principles of art and design connect the sculpture to the land?
Transition and pair/share – 5 min
- Students sit back down to their image and feedback. Discuss with a partner anything they found surprising, questions that might have come up or discoveries from the gallery walk.
- Ask students to share out something they discussed. (Target quite students)
Artist statement guided questions – 3 min
Distribute and explain using over head image from the power point document.
Now the students have an idea of how the audience will view their art, they can guide the audience’s experience with their artist statement.
Students answer the questions independently – 8 min
Peer edits – 7 min editing – 2 min to look over
The students swap their writing with a partner beside them to make suggestions and edits. Then change back to look over the new information
Artist Statements – Move to paragraph form– 6 min
Explain that we will have peer edits and I will edit their writing. This activity aligns with the department goal of strengthening student writing but students will only be graded on idea development and their evaluative process, not grammar or writing skills.
The students transform their answers from point form to paragraph form to create an artist statement.
Closure – What did you learn? Write and share – 4 min
Students write 4 sentences about things they learned in the unit. It can be about the environment, making sculptures, the elements and principles of art and design, Andy Goldsworthy, working in nature, place, time, circumstance, or themselves as an artist.
Share a few with your table group
Teacher asks for some volunteers to share out.
Clean up and hand in –2 min
Students are to hand in their artist statements, guided artist statement questions, their image and their learning summary for grading. Grades will be ready in 1 week.
THANK THE STUDENTS ON A UNIT WELL DONE!!!!
|
All students’ printed images from the previous class
Projector
Computer
Gallery walk file
4 different coloured post-it notes x # of students
Artist statement guided questions x # of students
Artist statement paragraph x # of students. |
Formative
- Gallery Walk
- Class discussion
Summative
- Artist statement Guided questions
- Artist statement Paragraph
- Learning summary
- Image
|
Assessment
1) Demonstrate a willingness to try unfamiliar materials and processes and adapt familiar ones for unfamiliar uses.
Formative
- Day 1 – Hook to Group discussions – In table groups, students have a 5 min discussion about the materials (sticks, rocks, leaves, berries, water, grass, dirt) presented in the lesson hook. Questions to consider; 1) What materials do you see? 2) Can art be made of these items? 3) How could you make something that describes a place and time from these items?
- Day 2 – Student/Teacher Conference – As students are working, teacher visits each student to ask questions pertaining to their materials and processes.
Summative
- Day 3 – Peer analysis through gallery walk – Students analyze the work of their peers and answer questions pertaining to materials and processes. Their ideas and advise are considered in their final grade based on the criteria the students made for the project.
- Day 3 – Learning log – Students write about what they learned as a closing activity.
2) Demonstrate an awareness of safety and environmental considerations related to materials, technologies, and processes.
Formative
- Day 1 – Collaborative criteria creation through mind map – Students work as a class to create criteria for the project. If they do not come to it on their own the teacher must make sure to ask guided questions that lead the students to issues regarding environmental sensitivity as one part of the criteria.
Summative
- Day 2 – Teacher observations and Student/Teacher conferences – As students are working, teacher visits each student to ask questions pertaining to their process as it pertains to environmental sensitivity.
3) Create 2D and 3D images that combine and emphasize particular visual elements and principles of art and design.
Formative
- Day 1 – Elements Trivia – Students participate in a trivia game which acts as a review of the elements and principles of art and design. A few questions also pertain to the elements of the Earth; wind, fire, water, earth
- Day 1 – Class discussion – Students participate is group and class discussions about the elements and principles of art and design.
- Day 1 – Students sketch preliminary ideas for their Earthwork.
Summative
- Day 2 – Earthworks – Students create and document their own Earthworks with a focus on one or more of the elements and principles of art and design.
4) Analyze 2D and 3D images for their use of particular visual elements and principles.
Formative
- Day 1 – Analyzing Goldsworthy’s work – Students look at a power point presentation and discuss the use of the elements and principles of art and design in Goldsworthy’s creations.
Summative
- Day 3 – Guided Gallery walk – Students analyze the work of their peers by examining their use of the elements and principles of art and design.
- Day 3 – Artist Statement Guided questions – Students analyze their own use of the elements and principles of art and design while writing an artist statement.
5) Create images that incorporate elements from various artists, movements, and periods.
Formative
- Day 1 – Think/Pair/Share – After the power point presentation, students discuss the work of Andy Goldsworthy. The conversation is guided by questions on the projector. A) Was there anything that you saw that surprised you? B) How could you use the materials shown at the beginning of class to demonstrate your understanding of the elements and principles of art and design? C) Are there other natural materials you would like to try, if so what are they and how might you use them? D) What are the most important elements of Goldsworthy’s Earthworks?
Summative
- Day 2 – Student Earthworks – The students use the inspiration and philosophy from Goldsworthy’s work to create their own Earthworks.
- Day 3 – Guided Artist Statements – Students answer a handout of questions that is designed to aid them in the creation of an artist statement. Among others, students answer this question; What part of Andy Goldsworthy’s philosophy have you attempted to achieve though your Earthwork? Explain your reasoning.
The Rubric – On day one, students collectively make a mind map of Goldsworthy’s philosophy and their goals in creating similar Earthworks. This information is used to make a rubric which is presented to the students on Day 2.
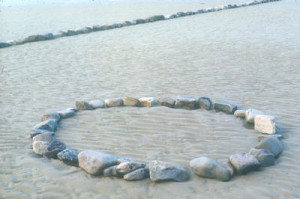
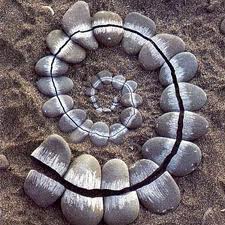
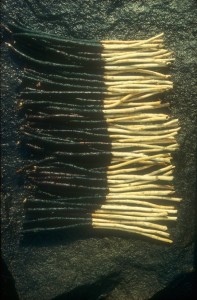
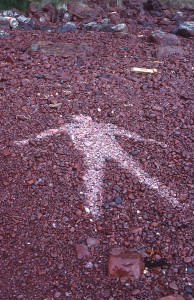
Andy Goldsworthy – Earthworks
About Goldsworthy
Born in 1956 in Cheshire, England
Raised in Yorkshire, England
Bradford Art College 1974–1975
Lancaster Art College 1975–1978
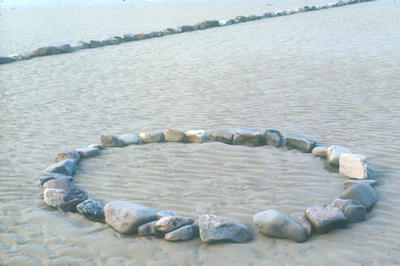
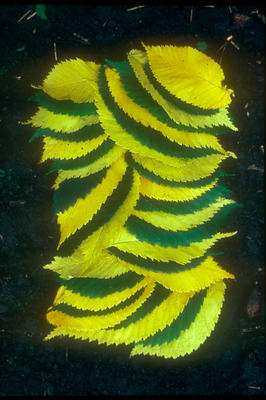
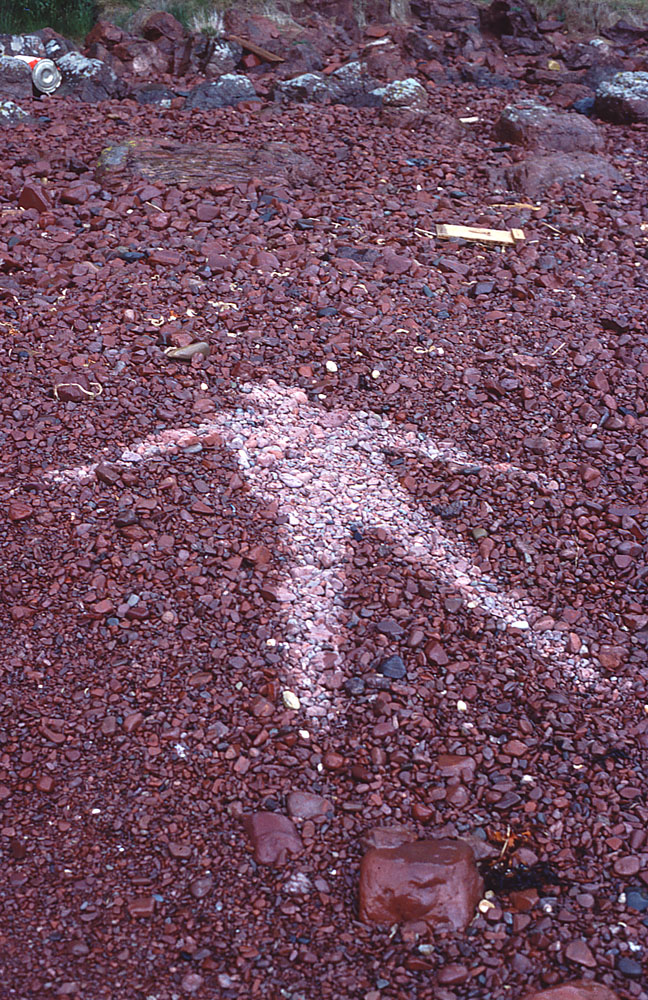
Andy Goldsworthy is an extraordinary, innovative British artist whose collaborations with nature produce uniquely personal and intense artworks. Using a seemingly endless range of natural materials—snow, ice, leaves, bark, rock, clay, stones, feathers petals, twigs—he creates outdoor sculpture that manifests, however fleeting, a sympathetic contact with the natural world. Before they disappear, or as they disappear, Goldsworthy, records his work in suburb color photographs.
Goldsworthy deliberately explores the tension of working in the area where he finds his materials, and is undeterred by changes by changes in the weather which may melt a spectacular ice arch or wash away a delicate structure of grasses. The intention is not to “make his mark” on the landscape, but rather to work with it instinctively, so that a delicate scene of bamboo or massive snow rings or a circle of leaves floating in a pool create a new perception and an ever growing understanding of the land.
Philosophy
For me looking, touching, material, place and form are all inseparable from the resulting work. It is difficult to say where one stops and another begins. Place is found by walking, direction determined by weather and season. I take the opportunity each day offers: if it is snowing, I work in snow, at leaf-fall it will be leaves; a blown over tree becomes a source of twigs and branches.
Movement, change, light growth and decay are the lifeblood of nature, the energies that I try to tap through my work. I need the shock of touch, the resistance of place, materials and weather, the earth as my source. I want to get under the surface. When I work with a leaf, rock, stick, it is not just that material itself, it is an opening into the processes of life within and around it. When I leave it, these processes continue.
The energy and space around a material are as important as the energy and the space within. The weather—rain, sun, snow, hail, calm—is that external space made visible. When I touch a rock, I am touching and working the space around it. It is not independent of its surroundings and the way it sits tells how it came to be there. In an effort to understand why that rock is there and where it is going, I must work with it in the area in which I found it.


Rational
The big idea: Working with the landscape and looking into the heart of nature through creation generates a new and ever growing understanding of place, time, culture, process, materials, and circumstance.
The students learn about Andy Goldsworthy and his art in order to expand their ideas of what art is and to gain an appreciation of how art isn’t only made for museums. It allows them to explore and work with nature in an attempt for them to grow more connected with nature.
Through this exploration they will work with familiar materials in an unfamiliar way and an emphasis is placed on the importance of environmental sustainability. The work of Andy Goldsworthy is analyzed for his use of the elements and principles of art and design. The students will use this new knowledge to build on their understanding of the elements and principles and their knowledge will manifest in their own Earthwork creation.
PLOs to be assessed: From the Grade 8 IRP for Visual Art
1) Demonstrate a willingness to try unfamiliar materials and processes and adapt familiar ones for unfamiliar uses.
2) Demonstrate an awareness of safety and environmental considerations related to materials, technologies, and processes.
3) Create 2D and 3D images that combine and emphasize particular visual elements and principles of art and design.
4) Analyze 2D and 3D images for their use of particular visual elements and principles.
5) Create images that incorporate elements from various artists, movements, and periods.


Recent Comments